Arborvitae trees have become the go-to choice for homeowners who want year-round greenery without fussy maintenance demands. These versatile evergreens thrive in most climates, grow predictably, and offer straightforward landscape versatility, whether you’re building a privacy screen, creating layered planting beds, or anchoring a focal point. If you’ve been scrolling through backyard inspiration but felt overwhelmed by trends that require constant tweaking, arborvitae landscaping delivers practical results that actually last. In this guide, we’ll walk through nine specific design ideas you can adapt to your own space, along with the honest maintenance talk you need before digging.
Table of Contents
ToggleKey Takeaways
- Arborvitae landscaping thrives across most North American climates (zones 2–8) with minimal maintenance, making them ideal for privacy screens, layered plantings, and focal points.
- Plant arborvitae screens 4 to 6 feet apart in spring or early fall, and maintain a tapered shape (wider at base, narrower at top) to prevent shade-related die-off on lower branches.
- Layered planting designs combine tall arborvitae (8–12 feet) as backdrops with mid-height shrubs and low groundcover to create visual depth and natural-looking clusters rather than rigid rows.
- New arborvitae trees require 1 to 1.5 inches of water per week during the first 18 months and a 2- to 3-inch mulch ring (kept 6 inches from the trunk) to prevent poor drainage and root rot.
- Specimen arborvitae placed near home windows, pathways, or entry points—with uplighting and a simple plant skirt—create year-round focal points without the replanting costs of seasonal flowers.
- Monitor for bagworms and spider mites in July and August, and treat early with neem oil or insecticidal soap to prevent rapid defoliation.
Why Arborvitae Trees Are Perfect for Backyard Landscaping
Arborvitae (Thuja species) earned their reputation for good reason. They’re cold-hardy across most of North America, zones 2 to 8 depending on the variety, and handle sun or part-shade without complaint. Unlike some evergreens that brown out in winter or demand acidic soil conditions, arborvitae adapt to neutral to slightly alkaline soils and don’t need babying.
Their narrow, columnar or pyramidal forms make them ideal for tight spaces and vertical accents. A mature ‘Emerald Green’ arborvitae reaches 60 feet tall but only 12 to 15 feet wide, meaning you can pack privacy into a compact footprint. Dwarf varieties like ‘Techny’ max out at 15 feet, perfect for smaller lots. The foliage feathers softly and holds its color year-round, giving you visual continuity when deciduous trees are bare.
Cost-wise, mature 5- to 6-foot bare-root or balled-and-burlapped arborvitae run $30 to $80 per tree depending on region and variety, making them budget-friendlier than specimen trees like Japanese maples or advanced shrubs. They’re also forgiving of transplant shock if you water consistently for the first year, a real advantage for DIYers nervous about plant loss.
Privacy Screens and Hedges: Creating Bordered Backyard Spaces
A living privacy screen is one of the smartest ROI moves in landscaping. Arborvitae row screens block wind, muffle noise, and create a finished edge to your property, all while looking intentional rather than fortress-like.
For a screen, space single-stem arborvitae 4 to 6 feet apart on center (that’s measured from the center of one tree to the center of the next). At 4-foot spacing, you’ll achieve a dense, no-gaps look within 3 to 4 years as the trees fill in naturally. Six-foot spacing saves money upfront but delays that full privacy wall by a year or two.
Plant in spring or early fall when soil moisture is consistent and temperatures aren’t punishing. Dig a hole twice as wide as the root ball and just as deep, depth matters, since planting too deep strangles roots. Backfill with the existing soil: no need for fancy amendments unless you’re in compacted clay, in which case work in 20% compost to improve drainage.
To keep a hedge tidy, give it a light trim in early summer and again in late August. Never strip the lower branches bare, arborvitae won’t regenerate from naked wood the way boxwoods do. Instead, shear the top third and taper the sides slightly inward (wider at the bottom, narrower at the top) to prevent shade-induced die-off on lower sections. One homeowner’s experience: planting a 40-foot ‘Emerald Green’ screen along the north property line took about three weekends of digging and hauling, but added both privacy and a 10-degree wind-break that actually reduced heating costs the following winter.
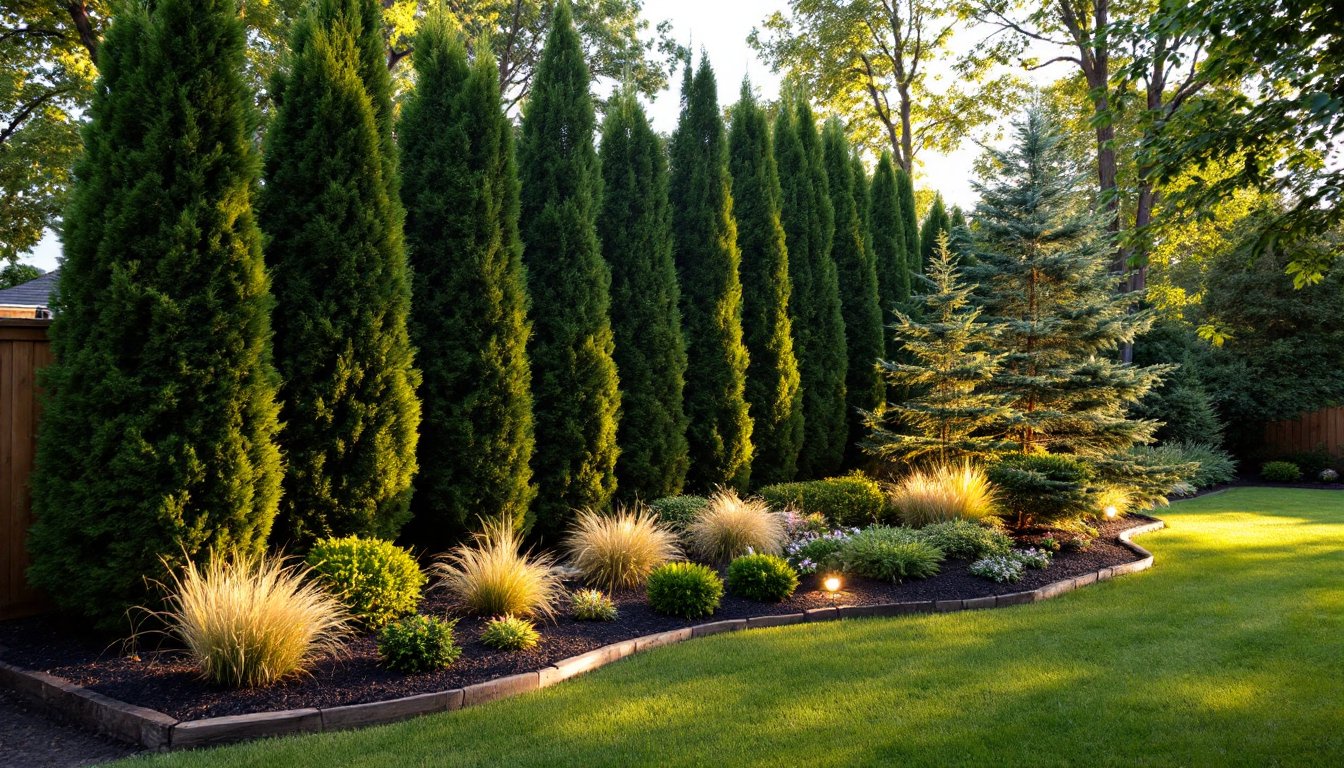
Layered Planting Designs for Depth and Visual Interest
The most sophisticated backyards don’t rely on a single tree type, they combine heights, textures, and seasonal interest. Think of layering like a visual pyramid: tall arborvitae in back, mid-height shrubs (junipers, spireas) in the middle, and ornamental grasses or low perennials up front.
Mixing Heights and Textures
A classic three-tier setup uses tall arborvitae (8 to 12 feet) as backdrop, flanked by dwarf conifers (3 to 5 feet) for visual weight, and low groundcover or flowering shrubs (under 2 feet) at the perimeter. This creates depth without visual chaos, your eye travels from foreground through background naturally.
When combining plants, contrast fine textures with bold ones. Arborvitae foliage is feathery and soft: pair it with the finer needles of Eastern red cedar (which tolerates drier spots) or the chunky leaves of deciduous viburnums for seasonal pop. Don’t just line things up in rows either, stagger plantings in drifts of three or five plants to mimic natural clustering and make the design feel intentional rather than regimented.
Hardscape balance matters too. A property we’ve seen transformed featured a timber retaining wall anchoring a slope, with arborvitae rising behind it and lower-growing junipers in front, instantly finished and professional-looking. Slope landscaping strategies apply here: use elevated beds or terracing to add visual interest while solving drainage or soil compaction issues. Layered designs also work on flat ground, just use the height and texture variation to guide the eye through the space rather than letting it go flat from corner to corner.
Accent and Specimen Plantings for Focal Points
Not every arborvitae needs to hide in a screen. Specimen-grade trees, especially columnar varieties with striking color or unusual form, shine as standalone focal points in a landscape. A single mature ‘Degroot’s Spire’ arborvitae with its deep emerald color and narrow, almost architectural silhouette commands attention in a small courtyard or beside a patio.
For specimen placement, position the tree where it’s visible from your home’s main windows and walkways. Pair it with a simple low plant skirt, hostas, sedges, or clipped boxwood, to anchor it visually and prevent the base from looking gangly. Avoid planting specimens in the exact center of a space (it feels static): instead, offset it using the rule of thirds: place it one-third from the left or right edge of a view.
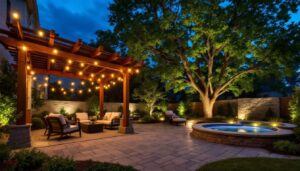
Lighting adds drama. A uplighting fixture (hidden at ground level, shining upward) transforms a specimen tree’s form into an evening feature. Arborvitae’s fine texture catches light beautifully, creating shadow patterns on nearby structures.
Arborvitae also pairs well with hardscape. Site a specimen next to an entry gate, at the terminus of a pathway, or beside a bench to create a visual anchor. One designer paired a dwarf golden arborvitae with a granite bench and ornamental grasses, creating a small meditation nook that required minimal ongoing maintenance, the tree needed only one light shearing per year, the grasses a late-winter cut-back. Outdoor landscaping ideas sometimes overlook the power of quiet, green focal points in favor of showy flowers, but evergreen specimens deliver year-round impact without annual replanting costs.
Maintenance Tips for Healthy, Thriving Arborvitae
Arborvitae aren’t fussy, but they do need honest prep and monitoring early on. The biggest killer is poor drainage and inconsistent watering, especially in the first 18 months after planting.
Watering: New trees need 1 to 1.5 inches of water per week during the growing season. Water deeply and less frequently (rather than shallow daily sprinkles) to encourage deep rooting. Once established (after year two), they tolerate drier spells, though prolonged drought stresses them. In fall, water extra before the first hard freeze, this counterintuitive step hydrates the roots so winter desiccation doesn’t damage the foliage.
Mulching: Apply a 2- to 3-inch ring of composted bark mulch around each tree, keeping it 6 inches away from the trunk base. Too much mulch or mulch heaped against the trunk invites rot and pest issues. Renew mulch annually to maintain that moisture-conserving and weed-suppressing buffer.
Pest and disease watch: Bagworms and spider mites occasionally plague arborvitae in hot, dry summers. Inspect foliage regularly, especially in July and August. If you spot small silken bags or fine webbing, spray with neem oil or insecticidal soap early in the morning. Don’t wait, bagworms defoliate fast. Fungal issues (root rot, phytophthora) are rarer if drainage is solid: avoid planting in perpetually wet spots.
Trimming: Light shearing in early summer and late August keeps plants tidy. Use sharp hedge shears or electric trimmers to avoid tearing foliage, which browns and invites disease. Never remove more than one-third of new growth in a single season: aggressive pruning can shock the tree. For specimen trees, a gentle shaping every other year is plenty. Reference Southern Living garden guides for detailed regional pruning calendars if you’re in the South, where humidity and longer growing seasons shift timing slightly.
Conclusion
Arborvitae landscaping delivers that elusive combination of impact, low drama, and genuine durability. Whether you’re screening a neighbor’s fence, creating layered garden depth, or anchoring a quiet focal point, these evergreens earn their place through honest, unfussy performance. Start with sound soil prep, consistent first-year watering, and regular light maintenance, do that right, and your arborvitae will be working for your outdoor space for decades. Your future backyard self will thank you.