Installing an electric tankless water heater can be a rewarding DIY project if you understand the system’s anatomy and follow proper steps. Unlike traditional tank water heaters, tankless models heat water on demand, saving space and energy, but they require careful planning around electrical capacity and water line sizing. This guide walks you through the installation process with practical diagrams and honest talk about what you can tackle and when you need a licensed electrician or plumber. Whether you’re upgrading an existing system or installing one fresh, knowing the component layout and wiring configuration is half the battle.
Table of Contents
ToggleKey Takeaways
- An electric tankless water heater installation diagram shows essential components including inlet connections, heating element chamber, control module, outlet port, and electrical terminals that work together to heat water on demand and save space and energy.
- Pre-installation planning must verify three critical requirements: electrical capacity (dedicated 20–50 amp breaker with proper wire gauge), water line sizing (at least 3/4 inch diameter for units over 10 GPM), and local permits and code compliance before starting any work.
- Hire a licensed electrician to run circuits from your main panel and install breakers, as most jurisdictions require this for safety, proper overcurrent protection, and code compliance.
- Install a shutoff valve, sediment filter (100–200 micron), and thermostatic mixing valve on the inlet and outlet to prevent leaks, protect the heating chamber, and provide anti-scald protection for household safety.
- Unlike gas tankless heaters, electric models require no exhaust venting but need adequate airflow (6–12 inches clearance) and minimal maintenance: filter replacement every 6–12 months and annual flushing with descaling solution for hard water areas.
- Bleed air from lines before first use, monitor for common startup issues like error codes or low hot water flow, and perform regular maintenance to extend heater lifespan from three years to eight years.
Understanding Tankless Water Heater Components
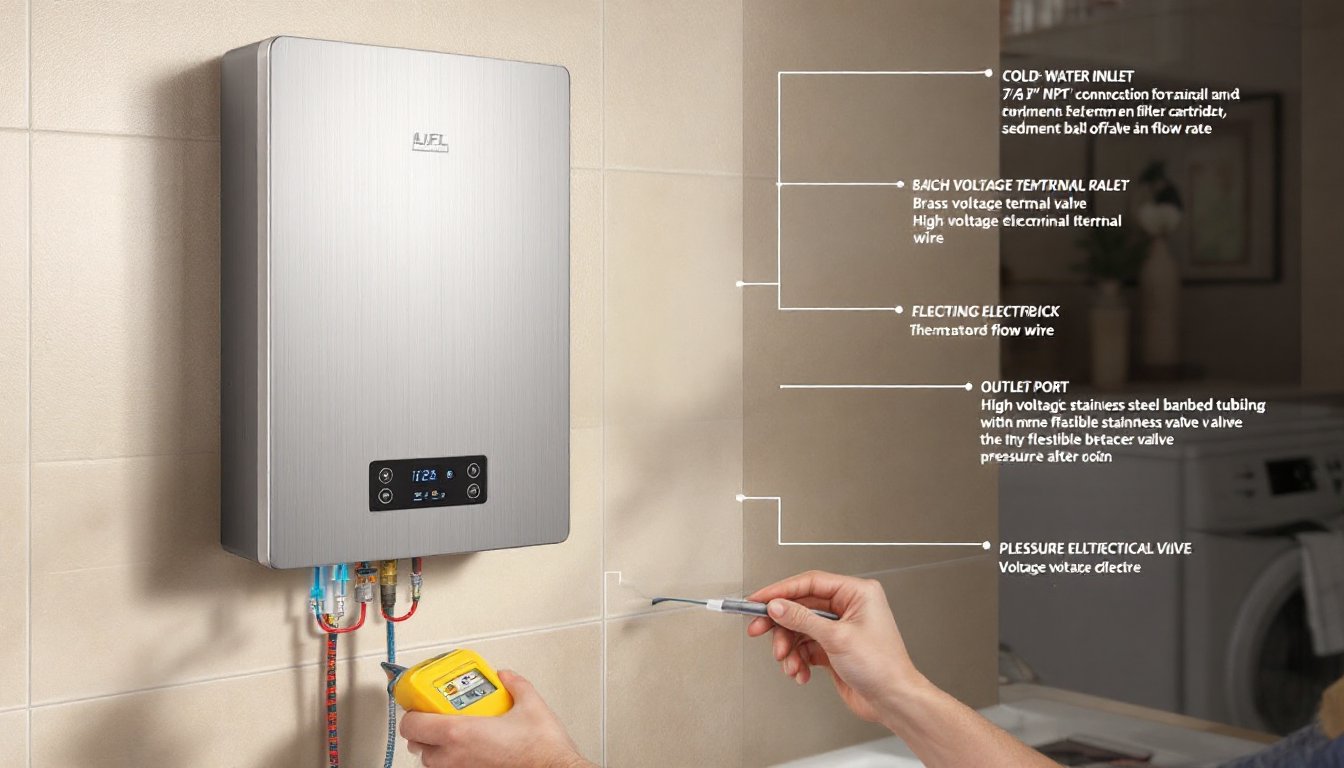
Every electric tankless water heater contains the same core parts: the inlet connection (cold water in), heating element chamber, temperature control module, outlet port (hot water out), and electrical terminals. The heating element is a high-powered resistor that rapidly brings water temperature up as it flows through. The control board monitors flow rate and water temperature, adjusting power to the heating element in real time.
You’ll also find a mounting bracket, thermostatic mixing valve (optional but recommended), and pressure relief valve on the outlet side. The mixing valve prevents scalding by blending cold water if the outlet temperature spikes. The relief valve protects the system if internal pressure exceeds the unit’s rating, typically marked at 80 psi for residential models.
Inlet and outlet ports are usually 1/2 inch NPT (National Pipe Thread) connections on smaller units. Some larger models use 3/4 inch. Check your unit’s spec sheet before ordering fittings and flex lines. The electrical terminal block accepts wiring from your main panel and typically requires a dedicated 20–50 amp breaker depending on the unit’s wattage, a 27 kW model, for example, needs a 50 amp circuit and 6 AWG copper wire.
Pre-Installation Planning and Requirements
Before you order fittings or rent a trenching machine, verify three things: electrical capacity, water line size, and local permitting.
Electrical Capacity: Check your main service panel. An electric tankless heater drawing 30–50 amps needs a dedicated breaker and adequate wire gauge running from the panel to the installation location. If your home has 100 amp service and existing loads are near capacity, you may need a panel upgrade, a job for a licensed electrician. Most jurisdictions require a licensed electrician for any breaker installation, so plan accordingly.
Water Line Sizing: Cold water supply to the heater must be at least 3/4 inch diameter for units over 10 GPM flow rate. A 1/2 inch line will cause pressure drop and inconsistent heating. Measure the distance from your main shutoff to the unit location and account for bends and fittings.
Permits and Inspections: Most areas require a plumbing permit for tankless water heater installation. Code officials want to verify proper venting (if gas) and electrical integration. Check with your local building department before starting. A missed permit can create headaches when selling or filing insurance claims. Installation according to manufacturer specs and local code is non-negotiable for safety and resale credibility. Many homeowners skip this step, don’t be one of them.
Water Supply and Inlet Connection Setup
Cold water enters the heater through the inlet port, so this connection must be solid and have adequate pressure. Standard municipal water pressure ranges from 40–60 psi: if yours is below 40 psi, a pressure tank may be needed.
Install a shutoff valve on the cold water line before the heater inlet. This lets you isolate the unit for maintenance without shutting off your whole home. Use a ball valve, not an older gate valve (which can stick). Follow the ball valve with a sediment filter rated for your unit’s flow, usually 100–200 micron. Sediment in inlet water clogs heating chambers fast, shortening the heater’s life.
Connect the filtered cold line to the inlet port using 1/2 inch or 3/4 inch flex tubing rated for 100+ psi (braided stainless steel is reliable). Teflon tape or thread sealant on all NPT threads prevents leaks. Wrap the tape clockwise three times around the male fitting threads before screwing the connector in. Tighten by hand, then add one more quarter turn with a wrench, over-tightening cracks brass fittings.
Inline water filters need periodic replacement. Mark on your calendar or set a phone reminder every 6–12 months to check the filter’s pressure gauge. A clogged filter starves the heater of flow and triggers error codes.
Electrical Wiring and Power Requirements
Electrical work is where most DIYers need professional help. A licensed electrician must run the circuit from your main panel and install the breaker, it’s code in most jurisdictions and ensures safe disconnects and proper overcurrent protection.
But, you should understand what’s happening. A 27 kW, 240-volt tankless heater draws about 112 amps, higher than a standard 50 amp breaker can handle safely. Double-check your unit’s nameplate for exact wattage and voltage. The electrician will size the breaker and wire to code: a 50 amp breaker typically uses 6 AWG copper wire, a 40 amp uses 8 AWG. Running undersized wire causes voltage drop and heat buildup in the wire jacket, creating a fire hazard.
The heater’s electrical terminal block has three terminals: Line 1, Line 2, and Ground. A 240-volt unit ties two hot wires to Line 1 and Line 2, and the ground wire to the ground terminal. A 120-volt model (lower power, supplemental use) uses one hot, one neutral, and ground. Verify polarity with a voltage tester after the electrician connects it. Always switch off the breaker before checking any connections.
Install a hard-wired disconnect switch within 3 feet of the heater for safe isolation during service. Some jurisdictions mandate this: others recommend it. It’s cheap insurance and good practice.
Hot Water Output and Venting Configuration
The outlet port delivers heated water to your home’s hot water lines. Install a thermostatic mixing valve (TMV) on the outlet if building code requires it or if you want anti-scald protection for showers and baths. A TMV costs $30–$80 and balances hot and cold water to limit outlet temperature to a safe setpoint, usually 120–130°F. Homeowners with children or elderly family members often add one for peace of mind.
Run the outlet line to your distribution system. Use 1/2 inch or 3/4 inch copper, PEX, or CPVC depending on your home’s existing plumbing material and local code. PEX (cross-linked polyethylene) is popular for new work, it’s flexible, cheap, and doesn’t require solder. But some jurisdictions restrict its use indoors or require UV-resistant type. Ask your plumbing inspector what’s allowed before you buy materials.
Unlike gas tankless heaters, electric units don’t produce combustion byproducts, so no exhaust venting is required. This is a major advantage: simpler installation, no flue, no combustion air intake. The only venting consideration is ensuring the unit has adequate airflow around it, check your manual for clearance specs, typically 6–12 inches on all sides.
Insulate hot water outlet lines with foam pipe wrap to minimize heat loss, especially if lines run through unheated spaces. You’ll preserve temperature and reduce energy use.
Final Inspection and Troubleshooting Tips
Once plumbing and electrical are complete, your local inspector will want to verify proper connections, breaker sizing, backflow prevention (if required), and water supply adequacy. Don’t skip the inspection, it’s your ticket to a code-compliant system and insurance coverage.
Before running water for the first time, bleed air from the inlet and outlet lines. Open the nearest hot water faucet and let it run for 30 seconds. Air pockets in the lines can cause noise and pressure fluctuations. The heater also comes with a fill instruction, open cold water shutoff slowly and listen for air whooshing out the outlet. A few seconds of sputtering is normal.
Common startup issues include: error codes (usually meaning low inlet flow, high outlet temperature, or electrical fault), no hot water (check breaker, verify inlet pressure, confirm water is flowing), and inconsistent temperature (adjust mixing valve if installed, check for sediment in filter). Reference your manual’s troubleshooting section, most units display error codes on a digital panel that decode to specific problems.
After installation, maintain the sediment filter every 6 months and flush the heating chamber annually with a food-grade descaling solution if you have hard water. Hard water mineral buildup reduces efficiency and shortens lifespan. Many DIYers skip this step and end up with a dead heater in three years instead of eight.
If you’re unsure about any wiring, plumbing, or code requirement, call a licensed pro. A tankless water heater is reliable when installed correctly, but mistakes cost more to fix than hiring help upfront. Resources like family handyman’s installation guide provide detailed visual walkthroughs, and this old house covers the process with diagrams for reference. Always wear eye protection and gloves when working with pressurized systems, and use proper tools from reputable sources to ensure safety and quality results.