A glass kitchen backsplash transforms more than just the wall behind your stove, it’s a practical upgrade that catches light, reflects your style, and makes cleanup remarkably simple. Unlike traditional tile with grout lines that trap spills and crumbs, a glass backsplash wipes clean in seconds and resists staining from sauces, oils, and daily kitchen grime. Whether you’re refreshing a dated kitchen or building from scratch, this project offers the perfect balance of aesthetic appeal and real-world functionality. In 2026, glass backsplashes remain a top choice for homeowners seeking modern design without the maintenance headaches.
Table of Contents
ToggleKey Takeaways
- A glass kitchen backsplash offers superior functionality with its non-porous surface that wipes clean in seconds and resists staining from sauces, oils, and grease without the maintenance issues of traditional grout.
- Tempered glass is the only safe choice for backsplashes, rated at 3/16-inch (4.5 mm) thickness for standard installations, and it shatters into blunt pellets rather than jagged shards if broken.
- Proper wall prep including degreasing and light sanding is critical for successful glass backsplash installation, as skipping this step leads to gaps, bubbles, and uneven finishes.
- Clear glass works best in small kitchens to expand the space, while frosted, colored, or textured glass options can define larger kitchens and complement specific cabinetry styles from farmhouse to contemporary.
- Maintenance of a glass kitchen backsplash is remarkably simple—daily cleaning with a vinegar and water solution takes seconds, and monthly squeegee application prevents water spots and mineral deposits.
- Installation requires silicone-based adhesive rather than grout, making DIY projects straightforward for homeowners with basic tools, and most jurisdictions don’t require permits for this cosmetic upgrade.
Why Glass Backsplashes Are a Smart Choice for Modern Kitchens
Glass backsplashes deliver solid wins on both form and function. The non-porous surface means bacteria and mold can’t hide like they do in grout joints, making your kitchen genuinely easier to sanitize. Light bounces across the glass, amplifying natural or ambient lighting and making smaller kitchens feel more open and airy.
They’re also incredibly forgiving if your kitchen layout shifts down the road, you can remove and reinstall glass without the permanent mess that tile grout creates. Installation is straightforward for DIYers with basic tools, especially when using adhesive-backed panels or full-sheet options rather than individual tiles. Building codes don’t flag backsplash work as a structural concern in most jurisdictions, so you won’t need permits for this cosmetic upgrade. The durability is solid too: glass doesn’t chip as easily as ceramic or porcelain under normal kitchen conditions, and it won’t fade or discolor over years of use.
Types of Glass Backsplash Styles and Materials to Consider
Your choices range from ultra-clear and minimalist to richly textured and colored, so the final look depends entirely on your kitchen’s overall aesthetic.
Clear and Frosted Glass Options
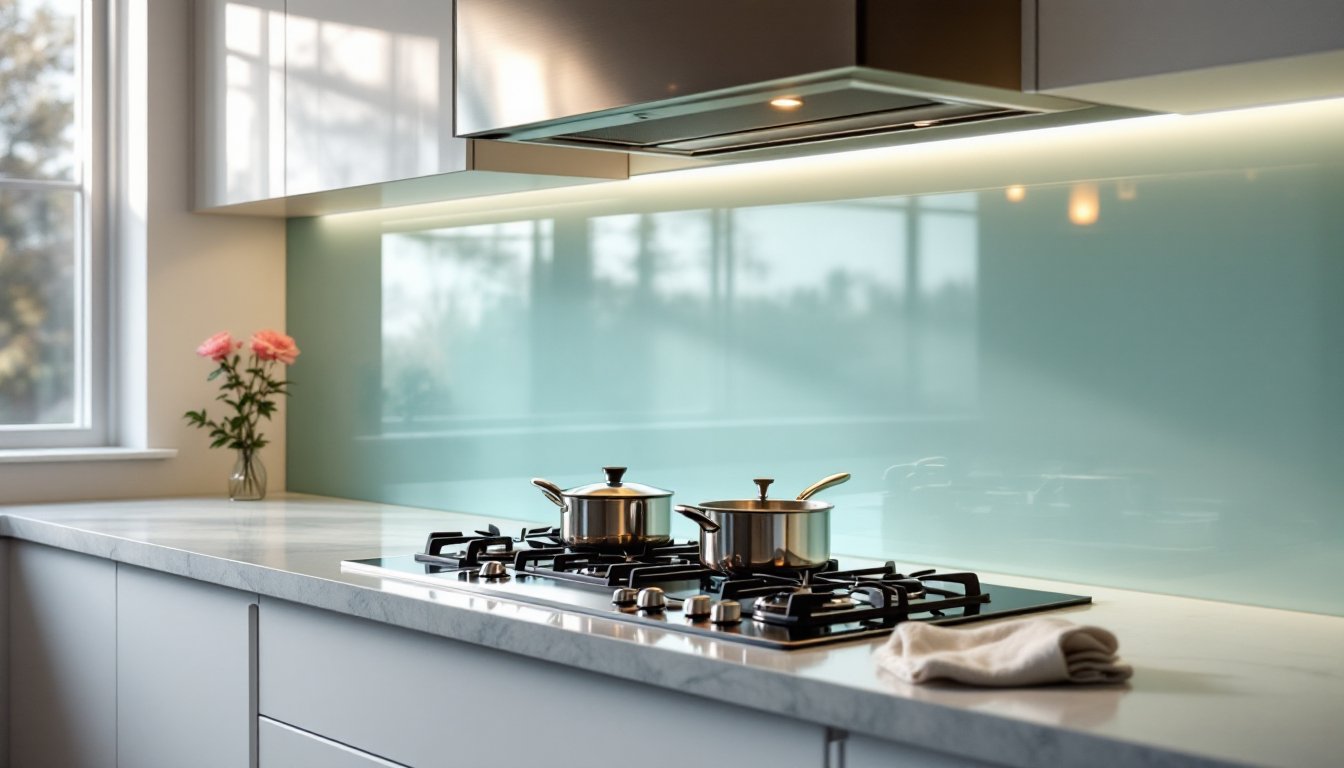
Clear glass is the classic pick if you want to showcase the wall color or existing tile behind it. This works beautifully in kitchens with white or light-colored walls, where the glass acts as a protective shield without visually competing. The transparency keeps the space feeling open, which is especially valuable in smaller kitchens. For a softer, more private feel, frosted or etched glass diffuses light while maintaining a clean, modern look. It’s also more forgiving if your wall behind isn’t perfectly finished, frosting masks minor imperfections better than clear glass.
Thickness matters here: 3/16-inch (4.5 mm) tempered glass is the standard for backsplash work. Tempered glass is heat-treated to be stronger and safer: if it breaks, it shatters into small, blunt pellets rather than jagged shards. Always specify tempered glass when ordering, it’s the only safe choice near a heat source.
Colored and Textured Glass Designs
Colored glass makes a bold statement. Think soft blues, warm grays, or even bold emerald greens that complement your cabinetry and countertops. Many manufacturers offer both solid colors and subtle patterns, linear textures, ripples, or frosted patterns add visual interest without looking busy. Textured glass can also hide fingerprints and dust better than smooth finishes, reducing maintenance between cleanings.
One consideration: colored glass can show water spots and mineral deposits more visibly than clear, depending on the color intensity and your water hardness. If that concerns you, a squeegee after washing dishes keeps spotting minimal. Textured options are typically 1/4-inch (6 mm) thick for structural stability and cost between $20 and $40 per square foot, while clear sheet options run $15 to $30 per square foot depending on finish and supplier.
How to Install a Glass Backsplash: A Step-by-Step Guide
Most glass backsplash installations use silicone-based adhesive and don’t require grout, making the process simpler than traditional tile. But, the wall prep is where most DIYers stumble, skip it and you’ll have gaps, bubbles, and an uneven finish.
What you’ll need:
- Tempered glass panels or sheets (measured and cut to fit your space)
- Silicone construction adhesive (not caulk, adhesive is stronger)
- A caulking gun
- Straight edge or level
- Painter’s tape
- Grout sponge or soft cloth
- Safety glasses and work gloves
Installation steps:
-
Measure and prep the wall. Measure twice from your countertop up to your upper cabinets, accounting for any outlets or stove details. The standard backsplash height is 18 inches, but adjust if your upper cabinets sit lower. Clean the wall thoroughly with a degreaser, residue from cooking grease prevents adhesive from bonding properly. Sand any glossy finishes lightly with 80-grit sandpaper to improve adhesion.
-
Mark reference lines. Use a level to draw light pencil marks indicating the top and bottom edges of where your glass will sit. This keeps panels aligned as you work upward from the countertop.
-
Apply adhesive. Run a continuous bead of silicone adhesive along the wall, about 1/4 inch thick, following your reference lines. Apply more adhesive in small sections rather than the entire wall at once, it sets quickly and you need time to position panels before it hardens (usually 24–48 hours for full cure).
-
Position panels carefully. Press the glass firmly against the wall, using gentle, even pressure. Work from bottom to top so gravity helps hold each piece in place. Use painter’s tape to hold panels temporarily while adhesive cures. Don’t apply tape directly to the glass if possible: tape to the wall edges instead to avoid leaving residue on the glass.
-
Check for level. After every 2–3 panels, verify with a level that you’re staying straight. Small adjustments now prevent a noticeably crooked finish.
-
Seal gaps carefully. Once adhesive fully cures (follow the manufacturer’s timeline), apply silicone caulk to any gaps between the glass and countertop or cabinets. Use a caulking tool or your finger to smooth the bead and remove excess before it dries.
Safety note: Always wear safety glasses when handling glass sheets. Have a helper on hand if panels are large (full-sheet backsplashes can be heavy and awkward solo). If working around an active outlet, turn off power at the breaker and cover the outlet with a plastic outlet cover during installation.
Maintenance and Cleaning Tips for Glass Backsplashes
The biggest advantage of glass is how little upkeep it actually needs. Wipe spills immediately with a damp cloth to prevent dried sauces from hardening and becoming harder to remove. For daily cleaning, a simple mixture of white vinegar and warm water (1:1 ratio) cuts through grease and leaves the glass streak-free without harsh chemicals.
For stubborn buildup, let the vinegar mixture sit for 5–10 minutes before wiping. Avoid abrasive scrubbers or scouring pads, they scratch the surface. A soft microfiber cloth or sponge works best. Once or twice a month, squeegee the entire backsplash after washing dishes to prevent water spot accumulation, especially if you have hard water.
Tempered glass is durable, but avoid direct impacts from heavy cookware. Don’t install a glass backsplash directly behind a gas burner if the burner itself will contact the glass repeatedly, the thermal stress can cause unexpected breakage. An aluminum or stainless steel trim frame around edges (if your design includes it) also protects glass edges from chipping during normal kitchen activity.
Design Inspiration: Color Palettes and Kitchen Layouts That Work Best
Glass backsplashes shine when paired thoughtfully with surrounding cabinetry and counters. White and off-white kitchens benefit from clear glass, which creates a sleek, minimalist backdrop that doesn’t compete with the overall design. If your countertops are dark (granite, quartz, or soapstone), a frosted or light gray glass bridges the contrast beautifully. The softness of frosted glass prevents the kitchen from feeling too stark.
Warm-toned kitchens with wood cabinets pair well with soft blue, sage green, or warm gray glass that echoes natural tones without clashing. Modern kitchens with stainless steel appliances and contemporary hardware look crisp with clear or pale blue glass. For a bolder approach, many homeowners commit to a jewel-tone glass like deep teal or emerald, especially in kitchens with island seating where the backsplash becomes a visual focal point.
Small kitchens benefit from clear glass because it visually expands the space by allowing the wall color and cabinetry to shine through. In larger, open-plan kitchens, textured or colored glass can define the cooking zone without physically separating it. Design inspiration from resources like The Kitchn shows how glass backsplashes work across different kitchen styles, from farmhouse to contemporary. You’ll also find real examples on HGTV featuring before-and-after kitchen renovations that incorporate glass, helping you visualize the impact in various lighting conditions and layouts.
Consider how natural light moves through your kitchen during different times of day. Morning sun hitting a pale blue glass creates a serene effect, while afternoon light on clear glass bounces energy throughout the space. If your kitchen has a window or skylight, test your color choice in that specific lighting before ordering full sheets. Many glass suppliers offer small sample pieces or can show finish options under different light conditions.